Winlink RMS is Functioning – A How to and how it went.

Well, that was a fun adventure. That’s the only way I know how to describe it.

If you’re going to follow along or try and do this yourself here’s what we used:

Yaesu FT1500M – Bought from eBay for $113.10 with shipping and tax
Astron RS-20A Power Supply – Bought from HamRadio.com used for $134.39 with tax and Will-call
Tram Pre-tuned Antenna – Bought from Amazon for $66.79 with shipping and tax.
Signalink – Bought from eBay for $85.25 with shipping and tax
6 Pin Mini Din Cable – If you buy the signalink new it will come with the right cable, used may or may not, we bought used and had one laying around.
Intel Nuc – pulled from a decommission project *Free* (You don’t need a high powered computer for this project, Spend less than 100$)
LMR 400 and ends – Donated by KE5UB0

You’ll need an active Winlink Account and then you’ll need to follow the instructions at this page to get approved for your RMS.
I advise giving K4CJX more time than I did (I asked the night before like a dumb dumb.) 😛

Once you’ve done that, and you’ve set up your antenna, and you’ve wired in your radio, the next move is to configure the SignaLink to communicate. The Signalink is a straight forward device, one USB out to your laptop and then one (or two depending on radio) to the radio.

In this case we used this wiring diagram (you have to scroll down till you find the right connector, in this case the 6pin) and a straight through 6 pin cable, if you don’t want to wire it, Tigertronics makes a plug and play module, you can purchase, however as easy as it was to wire it, I saw no reason to buy the jumper module.

Now that that is all done, it was time to download the Vara Modem. Since we’re using a 2Meter band radio, we’re going to download Vara FM, grab it from EA5HVK’s Website, if you’re going to do a different frequency get the proper one for the frequency you’re running.

Now go download the Winlink RMS software. You’ll want to go to Winlink Downloads > RMS Packet install.

Next open, run the Vara FM install and let’s tune it. This was a super handy guide that got me all set up. Literally, just follow the recommendations and tune back and forth and you’ll eventually get it dialed in just right, it took me about 10 minutes and I tuned mine against an RMS station 45 miles away! (Our omni was mounted 60′ up though).

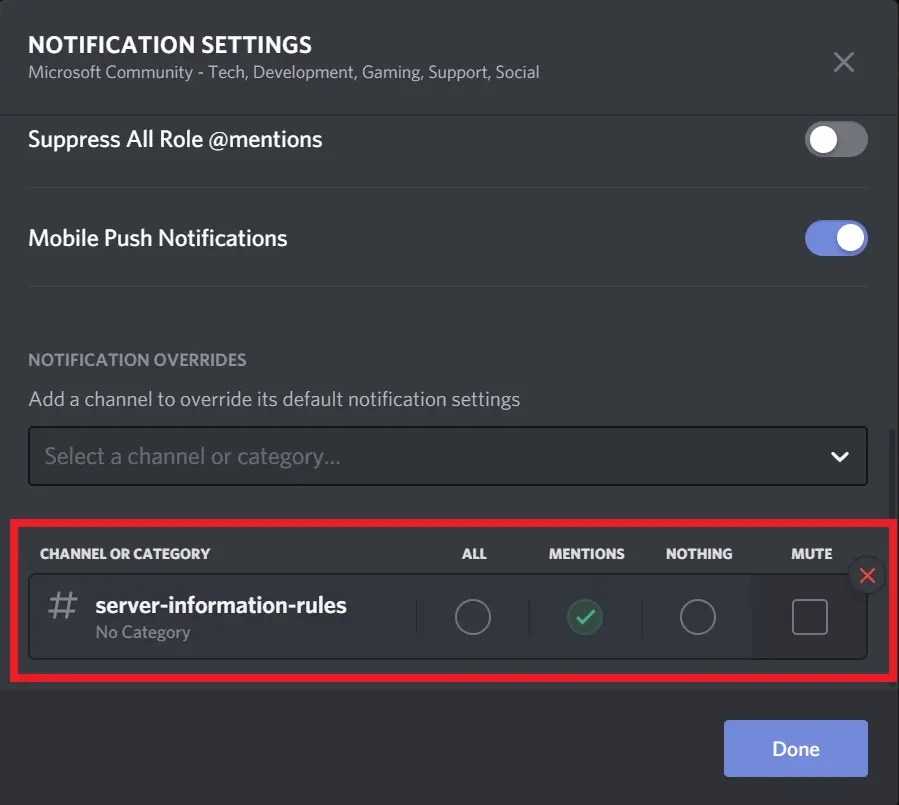
Next it’s time to set up your Winlink RMS Packet software, this one was pretty straight forward, run the install file and open it, follow the prompts and input your grid square (Here’s one of a 100 websites, when I applied for ARIN there was an even better website, but I’m struggling to find it.)

Major settings to note:
Site Settings > Make sure to select “use direct access to TNC”
Vara FM Settings > Most of this is the default, fill out the bottom as expected, and make a nice Optional Log in Message, Mine says “Winlink for Waco / McLennan County”

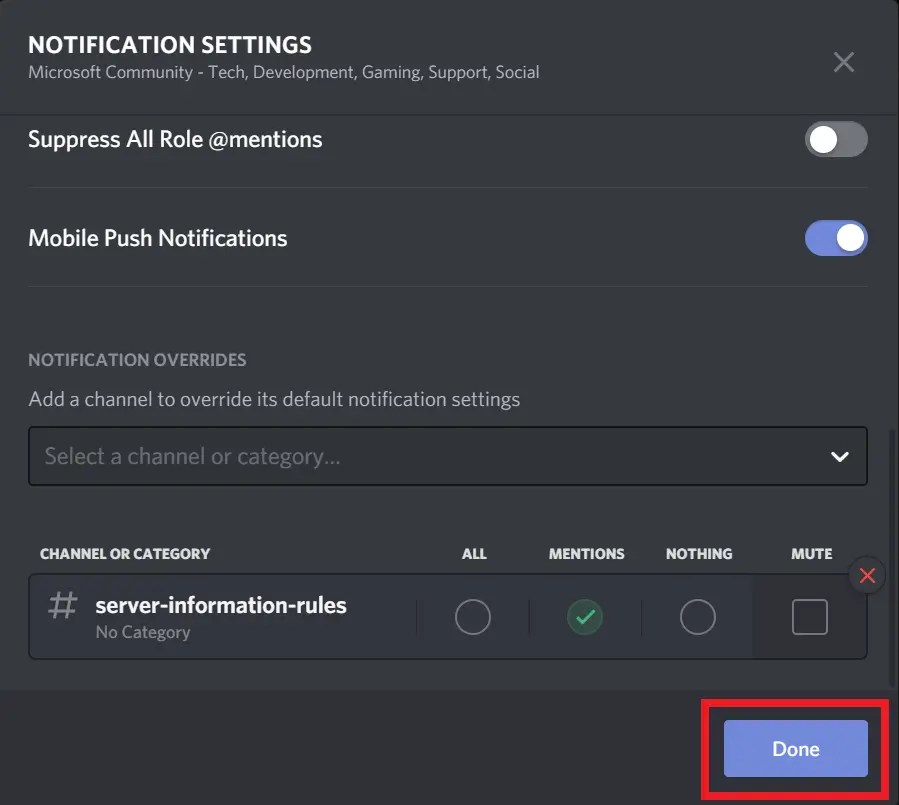
Once that’s done it’s time to have someone connect!

So far KD5UEW has been nice enough to check our set up almost daily and by the logs it’s been working every time! =)

The next article will hopefully be me detailing how I connected a Digirig and a Baofeng HT to my radio surface and hit the RMS server from 5ish miles away 😉

This project took us about three weeks to complete, mostly because I chose to go on vacation the day AFTER we installed the antenna. Now that I have everything compiled, once Antenna is run, I expect this would take approximately 30-45 minutes to get set up and working. But we’ll know soon enough, I added a Duplexer, so that I can configure a 70cm Radio to work as well for maximum compatibility. (That article involves a TYT radio, but we are working on the wiring from the Signalink to the TYT and then we need to locate a donor computer for the Vara FM, OR find out how to run Vara FM and Winlink RMS twice…) I hope this helps the next person get Winlink RMS set up!

Note: I chose my frequency by going to this website and searching those near me and mirroring it. Select Vara FM and then find your location and see what’s around you. I chose 145.030 as that seemed to be the frequency most people around me were using.

How to use Discord

Creating a Discord Account

  1. Go to discordapp.com.
  2. Click Open Discord in your browser.

    Homepage

  3. Enter the username you want to use and click the arrow.

    Username

  4. Complete the Captcha as directed.
  5. A popup will appear and give you the option to Get Started with creating a new server, or skipping ahead to finish creating your account. Click Skip.
  6. Discord will then ask you to claim and secure your account by entering your email address and setting a password. When done, click Claim Account.

    Claim

  7. A popup will appear to offer a download link for the Discord desktop application, click X to skip this for now.
  8. To complete the account creation process, log into your email account and find the confirmation email. Click the link within that email to verify your new Discord account.

Congratulations, you have now created a Discord account!

Managing Discord Friends List

While most Discord users interact via Discord servers, it is also possible to set up a contact list or Friends List on Discord. This list allows you to interact with other users via direct message and voice or video calls.

  1. To Add a friend on Discord, click on the Add Friend button at the top of the Discord Home Page.
  2. Next, you will be prompted to enter a username. This username will be the DiscordTag of the friend you wish to add.

    The DiscordTag is a username followed by a # symbol and a series of random numbers and can be seen on the bottom left hand corner of the Discord interface.

    You can also find the DiscordTag by clicking on the profile picture of the user you wish to add as a friend. This will take you to their profile page, which will show the DiscordTag. There is also a Send Friend Request button on the profile page that you can click to directly send a Friend Request.

  3. Once you have entered the DiscordTag you wish to add, click Send Friend Request.
  4. After the other user has accepted your friend request, they will then show up on your friends list.

Congratulations, you now know how to add friends in Discord!

Joining a Discord Server

As Discord communities are housed in distinct servers, you will need to find a server that suits your interests. Once you have located a community you’d like to participate in, you will then need to join their server. We will outline this process below:

  1. Click on the Magnifying Lens symbol to start searching for servers.

    Find Server

  2. On the following page, type what you want to search for in the text field and press the enter key. In this example, we are looking for tech-centric communities with the search term “tech”.
  3. The search tool will then display a list of servers based on your search criteria. Click View to see the server homepage for any server that interests you.

    Search

  4. Once you’ve found a server you want to join, click Join Server at the bottom of the server homepage.

    Microsoft Discord

  5. The icon for the new server will now appear on the left-hand side of your Discord homepage for quick access.
  6. If you want to leave the server at any point, right-click on the server icon and select Leave Server. It will prompt you to confirm this decision. Click Leave Server again to complete the process.

    Leave Server

By following these steps you can add as many servers to your Discord homepage as you would like, giving you easy access to your favorite communities.

Changing Notification Settings

To make sure you never miss a moment, you may want to modify the notification settings for the servers you have joined. As some of the options may not be clear, we will outline and explain the process here:

  1. Right-click on the server icon for the server you want to modify.
  2. Select Notification Settings.
  3. The first option allows you to mute the entire server. Selecting this option still allows you to receive a notification if someone mentions your username in one of the chat channels. This is useful if you don’t want to be overwhelmed by notifications but still want to know when someone is trying to contact you.

    Notification Settings 1

  4. In the Notification Settings menu, choose from the following options:

    All Messages: You will get a notification every time a message is sent in one of the chat channels you have access to on the server.

    Only @ Messages: You will only get a notification if someone tags you by typing the @ symbol before your name

    Nothing: You will not receive notifications from this server.

    Notification Settings 2

  5. Below those options are three toggles that further modify your notification settings:

    Suppress @everyone and @here: By default, Discord notifies all users in a server when someone uses the tags @everyone and @here. Turning this option on disables those notifications.

    Suppress All Role @mentions: By default, Discord notifies all users assigned to a specific user role on a server when @UserRole is typed in one of the chat channels. Turning this option on disables those notifications.

    Mobile Push Notifications: By default, Discord will forward any notifications you receive to the email address associated with your account. Turning this option off disables those notifications.

    Notification Settings 3

  6. At the bottom of the menu, there is also the option to override the default settings of individual channels instead of the entire server. To do this, you click on the drop-down menu, select the channel you want to override, then check the corresponding bubble for which notification setting you want to change. This is useful for servers that have a large number of chat channels as it allows you to filter which channels you receive notifications from.

    Notification Settings 5

  7. When you are finished making changes, click Done to save the changes.

    Notification Settings 6

After setting up your notification preferences, you should be all set to start using Discord to enhance your online experience and find communities that match your interests without being overwhelmed by excess notifications.

Field day, Winlink, and Allstar Updates

Wow, time flies! I missed my chance to post some updates, so I wanted to go over what I’ve been able to do in my free time.


Allstar

So this one has been a bugger, what I’ve found is the allstar image is garbage, barely works if it works at all. Several people have advised I go try hamvoip.com to make my allstar node. So that’s on my list for HOPEFULLY this week, but work has been keeping me pretty busy, and my birthday, vacation, and 4th of July are all coming up very very fast.

Winlink

I was driving home a couple weeks ago and heard the comms on our local repeater of the guys trying to prep for the Winlink exercise and it spiked my interest. Not that I would probably use the winlink service very much, it seemed like a very easy thing I could contribute some tower space to. The catch? I wanted to do it as cheaply as possible but easily. So far I have spent approximately 300$ purchasing the parts, the last thing remaining is a Signalink USB sound card. Trying to get one on Ebay, but man people are crazy right now with pricing! If I get it at my budget, we’re talking a 400$ rig for winlink, if I have to buy at full price, we’re talking 450$ for a rig. But I hope to be able to do a tutorial of that when it’s all said and done, since I couldn’t seem to find many tutorials on WHAT kind of radio to buy to make it easy! 😛 Which seems to be a common thread. I ended up purchasing a Yaesu FT1500m for the Winlink, and plan on using Vara FM with a Signalink USB, but we’ll see how those plans meet engagement!

Field Day

So that was actually quite a lot of fun, I missed the first half, but got to the club around 9pm yesterday, and around 1030/11, while working 20m I made contact with a BC Canada Station on QRP! 13 Watts! That was kinda cool, but definitely lots of issues with propagation, I went home around 1230, but when I got back the rest of the club let me know there was plenty of atmospheric interference, so that sucked! Looking forward to the next event, and I am definitely interested in the Radio we used for QRP, Makes me want to go after my next license class so I can use it in the field!

Truck Radio

Picked up a Yaesu FT400 for the truck, and wired it in. For about a week, I was complaining about how low the volume on the speaker was, turns out, adjusting the volume knob helps a lot! Got APRS working on it too! So excited for that, and very happy to have a radio in my daily driver.

Anyways there’s just a quick update for what’s been going on on this side of the world!

Allstar – Round 1

So yesterday, me and Roland got the NMO soldering back together in the jeep and we got the UV5001 all set up. Just to learn the transmit was barely three blocks! 😛 Going to try and sync up with Drew or Matt and test some random antennas and see if we can get a better signal. Also on my list this week is to purchase what Roland affectionately calls a Chinese Tape Measure antenna. I ended up ordering one of these last night so that I could attempt to check in to the Monday Night Weather net for HotArc, which for 10$, if it works better than the Nagoya I bought, I’ll be super happy!


Late last night I started working on the next project which was to get All star set up at our office and to begin planning it’s path, which just devolved into me and Matt cursing the futility of trying to research this system. Lots of documentation everywhere, but none of it is actually… HELPFUL. So finally after much much digging, we found a small link that seemed to indicate an Alinco DR135T / EMkIII was compatible, in stock “locally”, and inexpensive.


SO, now we had our radio, time to find out how to connect it!

After much digging and browsing through some very old HTML websites that were built in 95 (not a joke), I came across K5TRA’s website on Allstar where he had several pictures of custom rigs he had built. Viewing these made the AHHA! light turn on and I started understanding what needed to happen. Shortly after that I came across kuggie.com, across kuggie.com, this turned out to be Kevin K. Custer  W3KKC’s website that linked to  his other websites. After reading a few of those, which were still hard to browse, but MUCH easier now that I had the AHHA moment, I decided to simply e-mail him, as his site didn’t necessarily tell you what you needed. His response to getting the Alinco hooked up to Allstar was to purchase the DRA-50, DRAC-12, and the Alinco-6 Adapter. If I understand it all correctly in the line up, my PC connects to the DRA-50 via USB-B, the DRA-50 connects to the DRAC-12 cable which is just a 6 pin basic mini-DIN cable (Could be had for cheaper on Amazon but at the risk of not all 6 conductors being actually wired), and the DRAC-12 plugs into the Alinco-6 which converts DSUB-9 (Serial) to mini-DIN-6! Voila plug and play, or as plug and play as I’m going to get with this project!

So I went ahead and ordered the components from Master’s Communications (Which cost me 111$), and I’m going to drive up to Plano Friday and visit Ham Shack Outlet and pick up the Alinco, and maybe lose a little more money looking around 😉

The software component is something we’re working on currently. We moved our Broadcastify server over to Linux and using Darkice and a dedicated box, but have developed a most annoying whine inside the audio feed, and haven’t been able to isolate it yet. I suspect simply a crappy motherboard and sound card, and that if I move it back to the USB Sound card the whine may clear up. But, because of this, we do add a little extra complexity to our deployments. Which I will have to remind Roland to post the documentation or at least link to the different articles we’re using so that we don’t lose track and forget how to take care of these systems in a month :P. The final intent with this system is to have multiple inputs that we are streaming to multiple locations. Ideally we will connect the allstar node to hamshack hotline, AND to our company PBX so that we can access it from anywhere, and I would like to get the Waco PD feed and the China Spring Fire feed listed as broadcastify feeds that I can also hook up to Hamshack and to our PBX as Music On Hold classes. We have about half of this done, we have the darkice program running which is streaming the input to broadcastify, and we have ice cast installed but have made no progress on making it work :(.


Anyways that’s today’s update, I know these are coming out weirdly spaced, but honestly, I’m just updated this as I go so that if/when we forget what we were doing we can look back and see where we were at!

Club Meeting 4/28 and Radio Installs 4/29

Well, I finally got to attend my first meeting! That was a lot of fun, and met some very fun people. Meeting started at 7 and was done by 745 and me and Roland were voted in, however I stayed until almost 10pm chatting with another fellow IT Ham. I learned quite a bit and definitely helped shape my current focus while waiting on a response from AMPRNet.

Our next focus was to get a mobile unit installed in the jeep and then to validate the feasibility of a suggested cable path to my roof. To that extent we installed a RAK Wireless MNTD Hotspot for Helium Mining on the roof, and it was actually surprisingly easy. Josh got up in the attic and me and Roland got on the roof, they fished some UV rated outdoor CAT6 through a small hole in the bottom of my chimney and then Josh used some velcro inside to make sure the cable wouldn’t slide back in…. again….

And here was our final result:

Ultimately my end goal is to add 1 or 2 more larger antennas up there with the initial goal of just being able to hit the local repeater. I’ve been sitting here for an hour surfing the internet and my HT hasn’t received the CW Ident signal from the repeater yet. But I get it at the office now. Small steps forward!

As to the Jeep, we did successfully get it connected, but as so many things we seem to do lately, the guys were in a rush and did not get many pictures. I intend to make another post since the install isn’t totally complete, but it’s almost there. I purchased a Quadratec universal mount, and since I already had a Btech UV5001, we just decided to re-install that in the Jeep.

To mount the antenna I purchased a Driver Side Antenna Mount Bracket for the Jeep Rubicon. For the antenna, I took a chanced and purchased a “ghost antenna“, which we have major reservations about how it will do, but if it works, will be a very nice touch to the Jeep. During install, we had to peel back the protective gasket on the bottom of the antenna clip and remove the screws so that ultimately we could attach the antenna base to the Driver side mount, during this process, the solder broke between the base unit and the cable. So, it’s on the calendar for 4/30 to have Roland resolder it together, but that was a lesson learned and next time, I will definitely focus on more standard and easy NMO mounting options.

I started looking at Jeep Spare Tire Antenna Mount kits and cable with the intent of simply running a second cable to the tailgate and installing a mount kit for immediate or future use if the ghost antenna turns out to be absolutely useless.

I hope to have this install finished this weekend, and move on to our deployment of a linux streaming server and ultimately investigating our first allstar node. We did get a server up and running but learned that the SDR we have does not like the processor that is in the box we’re using, so before we try to roll that into production we’re looking into solutions. Roland is dead-set on using a powered USB hub and an intel NUC that is being decommissioned from a customer because it’s an Intel core i5, however I’m concerned we will get weird issues over time with it. Our current road map for that project is to get ice cast working and use the trunktracker for Waco PD, and then use the SDR for McLennan County Fire. And a pipe dream hope is that we can use the same SDR to listen to multiple frequencies. and input them, but if not, we’ll add another SDR and possibly use that for one way audio. Our end goal with this box is to be able to utilize the audio streams in FreePBX as Music On Hold classes so anyone on our servers could listen to the feeds with little to no effort. Our end goal with the All star node is to be able to transmit without the need of a base radio at our hoses and communicate with the Eddy Repeater.

Upcoming Project – AMPRnet

With Roland going for his license next week and our first HAM Club meeting next week, I wanted to post another project that is moving up our Radar.

As part of our company continuing education we’re moving to learn BGP in May with Rick Frey Consulting on Mikrotiks, which is the standard routers we use at work for all of our customers. A Few weeks ago I was speaking with a colleague who mentioned he requested a /24 from AMPRnet many moons ago and was successfully using Mikrotiks as a plug and play service for HAMs. In that you request/purchase a pre-configured router from him and it provides you 5 Public IPs over a VPN connection to his cloud router which was peering the /24 from AMPRNet. The reason for this ostensibly was to circumvent rural and cellular based ISPs that were performing CGNAT, double NAT, Triple NAT, and even just straight up port blocking on the networks. Things all required to get systems like EchoStar and Dstar online. Even VoIP in some areas can benefit from this. As part of our project and this Radar.

Our goal is to build a front end “store” on KI5PCQ.com that allows HAMs to request a Public IP or a block of Public IPS, pay for it (unfortunately this still incurs a cost to us even though AMPRnet provides the IPs, for example the Cloud router will still cost approximately 240$/Year to operate, not to mention the maintenance on the automation and eventual admin overhead of ensuring IPs are being used appropriately.) and/or order a mikrotik direct from one of our distributors (For as low as 25$ plus shipping in many cases). The educational aspect of this will be learning how to integrate ZOHO’s payment portal and Sales API with Mikrotik’s API and even integrating it with the FCC Database. The end goal being a completely automated system that allows a Licensed Radio operator to request an IP, pay expected fees (Approximately 1-2$/Mo/IP), order a router if needed, and if not how to configure existing Routers (We intend to have multiple Docs on how to configure the most Common Mikrotik’s for plug and play use), and receive credentials all within a matter of minutes. Allowing more clubs and more operators to get on AMPRnet and start using it and utilizing it’s benefits with very low costs to operators.


That being said, the first step is get to registered on the AMPRNet portal!

Talk to y’all soon!

The Beginning of My Journey

Welcome!

I made this page to help track my journey!

Things I’ve already done:
Get my license!
Get my hamshack hotline number!

Some of the things on my list to do this quarter:
Join a local club!
Make first contact!
Install a rig at the office and connect it to AllStar and Dstar.
Install a rig at the home office and connect it to Allstar and Dstar.
Install Hamnet at office and home office.
Install nodes at the house and practice connections between the two.

Looking for recommendations on equipment on a budget, or donations, or leads to purchase good equipment!